

sRGB and Linear Color Spaces

Recently I came across a problem where HDRI images I loaded and converted into cube maps looked simultaneously too bright and too dark.

I found that a simple linear to sRGB conversion made the images look as I would expect.

I have read about sRGB and linear color spaces before, but for some reason this time it just clicked and I understood. Maybe since I am not longer dealing with low-level Vulkan nonsense, I have extra mental capacity to spend on more high-level concepts like this. In any case, I find this stuff is usually not explained very well and I want to show you how it works, in simple terms everyone can understand.
The basic idea of sRGB color space is that the way we perceive lightness in an image is wrong. Look at the gradient below. The change in the left-most 25% of the image looks much greater than the change in the right-most 25%, but it's not:

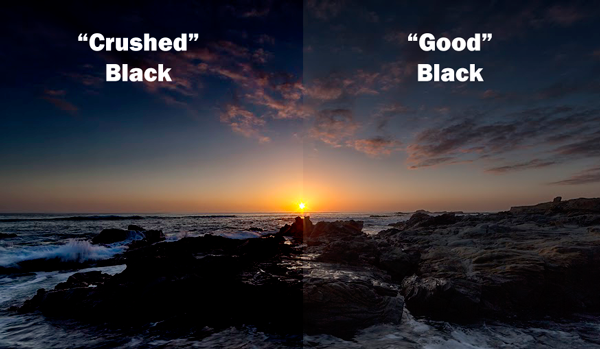
A long time ago, photography folks all agreed that these types of gradients look wrong. You will often see this referred to as crushed blacks, the opposite of overexposed bright colors, and it's usually considered to be a bad thing:
In 1996 HP and Microsoft came up with an equation that makes a gradient that looks "right". This is called sRGB color space, and it just shifts the darker tones to the right with a simple equation. The resulting gradient below looks more "balanced", even though it's really unbalanced:

The only problem is that since these colors are stretched, all our nice neat color math is no longer valid. Multiplying two colors together like we do for lighting won't produce the right result because the colors have all been shifted to the right by varying amounts.
The solution is to unstretch all colors by converting from sRGB to linear, perform your color math like lighting, and then shift the result back from linear to sRGB. Fortunately you don't have to modify your textures and colors, because sRGB is considered the "correct" value that we want to see, and linear color space is a temporary intermediary used for math. We can convert between these color spaces in a shader with the code below.
const float GAMMA = 2.2;
const float INV_GAMMA = 1.0 / GAMMA;

vec3 linearTosRGB(vec3 color)
{
    return pow(color, vec3(INV_GAMMA));
}

vec3 sRGBToLinear(vec3 srgbIn)
{
    return vec3(pow(srgbIn.xyz, vec3(GAMMA)));
}
Let's take a look at some math to see how light and color interact with this approach:
float albedo = 0.5;
float light = 0.75;

float color = albedo * light;

Print("Simple lighting: " + String(color));

albedo = sRGBToLinear(albedo);
light = sRGBToLinear(light);

color = LinearTosRGB(color);

Print("sRGB lighting: " + String(color));
The output of this program shows that converting from sRGB to linear and back results in lighting that doesn't get smashed by the albedo color:
Simple lighting: 0.375
sRGB lighting: 0.640292
What this technique basically does is it reallocates precision away from the bright colors, which we do not have as accurate perception of, and gives it to the dark colors, which we can see between more easily. With standard linear color a simple scene looks both dull and heavily contrasted:

The same scene comes to life when colors are converted from sRGB to linear before lighting, and then transformed back for the final color. We can clearly see a blue tint from the PBR environment map mixed with the orange color, and the dark gray colors have much more definition now. I don't even understand how something can be blue and orange at the same time, but I can clearly see a blue reflection from the sky in the image below.

This operation doesn't change the colors, it just changes the way that colors combine. Overall this makes it easier for lights to illuminate dark areas without requiring extremely bright lights with strong contrast, and the PBR lighting is more strongly visible in colored objects. This update is available now on the beta branch, in the standalone and Steam versions of Ultra Engine.
I used the Lua code below to create the gradient images. You can paste this into a Lua file and run it by selecting the Script > Run Script item in the main menu, or you can just paste this into the console and press enter, and it will run:
local pixmap = CreatePixmap(256, 16)

--Write linear gradient
for x = 0, pixmap.size.x - 1 do
    for y = 0, pixmap.size.y - 1 do
        pixmap:WritePixel(x, y, Rgba(x, x, x, 255))
    end
end
pixmap:Save(GetPath(PATH_DESKTOP).."/lineargradient.png")

--Convert to sRGB
pixmap = pixmap:LinearTosRgb()
pixmap:Save(GetPath(PATH_DESKTOP).."/srgbgradient.png")
I hope this explanation helps you to understand what sRGB and linear color spaces actually do and how this feature makes your games look better. It's actually a very straightforward concept that for some reason is poorly explained in most articles I have seen. Just remember, linear is the "squished" color for math, and sRGB is the "stretched" color that's easier to see (sRGB = standard stretched RGB).
-
 5
5

2 Comments
Recommended Comments