

Building Textures in Leadwerks Game Engine 5

Entry posted by Josh ·
3,121 views
The new engine features advanced image and texture manipulation commands that allow a much deeper level of control than the mostly automated pipeline in Leadwerks Game Engine 4. This article is a deep dive into the new image and texture system, showing how to load, modify, and save textures in a variety of file formats and compression modes.
Texture creation has been finalized. Here is the command:
shared_ptr<Texture> CreateTexture(const TextureType type, const int width, const int height, const TextureFormat format = TEXTURE_RGBA, const std::vector<shared_ptr<Pixmap> > mipchain = {}, const int layers = 1, const TextureFlags = TEXTURE_DEFAULT, const int samples = 0);
It seems like once you get to about 6-7 function parameters, it starts to make more sense to fill in a structure and pass that to a function the way Vulkan and DirectX do. Still, I don't want to go down that route unless I have to, and there is little reason to introduce that inconsistency into the API just for a handful of long function syntaxes.
The type parameter can be TEXTURE_2D, TEXTURE_3D, or TEXTURE_CUBE. The mipchain parameter contains an array of images for all miplevels of the texture.
We also have a new SaveTexture command which takes texture data and saves it into a file. The engine has built-in support for saving DDS files, and plugins can also provide support for additional file formats. (In Lua we provide a table of pixmaps rather than an STL vector.)
bool SaveTexture(const std::wstring& filename, const TextureType type, const std::vector<shared_ptr<Pixmap> > mipchain, const int layers = 1, const SaveFlags = SAVE_DEFAULT);
This allows us to load a pixmap from any supported file format and resave it as a texture, or as another image file, very easily:
--Load image
local pixmap = LoadPixmap("Materials/77684-blocks18c_1.jpg")

--Convert to RGBA if not already
if pixmap.format ~= TEXTURE_RGBA then
	pixmap = pixmap:Convert(TEXTURE_RGBA)
end

--Save pixmap to texture file
SaveTexture("OUTPUT.dds", TEXTURE_2D, {pixmap}, 1, SAVE_DEFAULT)
If we open the saved DDS file in Visual Studio 2019 we see it looks exactly like the original, and is still in uncompressed RGBA format. Notice there are no mipmaps shown for this texture because we only saved the top-level image.

Adding Mipmaps
To add mipmaps to the texture file, we can specify the SAVE_BUILD_MIPMAPS in the flags parameter of the SaveTexture function.
SaveTexture("OUTPUT.dds", TEXTURE_2D, {pixmap}, 1, SAVE_BUILD_MIPMAPS)
When we do this we can see the different mipmap levels displayed in Visual Studio, and we can verify that they look correct.

Compressed Textures
If we want to save a compressed texture, there is a problem. The SAVE_BUILD_MIPMAPS flags won't work with compressed texture formats, because we cannot perform a bilinear sample on compressed image data. (We would have to decompressed, interpolate, and then recompress each block, which could lead to slow processing times and visible artifacts.) To save a compressed DDS texture with mipmaps we will need to build the mipmap chain ourselves and compress each pixmap before saving.
This script will load a JPEG image as a pixmap, generate mipmaps by resizing the image, convert each mipmap to BC1 compression format, and save the entire mip chain as a single DDS texture file:
--Load image
local pixmap = LoadPixmap("Materials/77684-blocks18c_1.jpg")
local mipchain = {}
table.insert(mipchain,pixmap)

--Generate mipmaps
local w = pixmap.size.x
local h = pixmap.size.y
local mipmap = pixmap
while (w > 1 and h > 1) do
	w = math.max(1, w / 2)
	h = math.max(1, h / 2)
	mipmap = mipmap:Resize(w,h)
	table.insert(mipchain,mipmap)
end

--Convert each image to BC1 (DXT1) compression
for n=1, #mipchain do
	mipchain[n] = mipchain[n]:Convert(TEXTURE_BC1)
end

--Save mipchain to texture file
SaveTexture("OUTPUT.dds", TEXTURE_2D, mipchain, 1, SAVE_DEFAULT)
If we open this file in Visual Studio 2019 we can inspect the individual mipmap levels and verify they are being saved into the file. Also note that the correct texture format is displayed.

This system gives us fine control over every aspect of texture files. For example, if you wanted to write a mipmap filter that blurred the image a bit with each resize, with this system you could easily do that.
Building Cubemaps
We can also save cubemaps into a single DDS or Basis file by providing additional images. In this example we will load a skybox strip that consists of six images side-by-side, copy sections of the sky to different images, and then save them all as a single DDS file.
Here is the image we will be loading. It's already laid out in the order +X, -X, +Y, -Y, +Z, -Z, which is what the DDS format uses internally.

First we will load the image as a pixmap and check to make sure it is six times as wide as it is high:
--Load skybox strip
local pixmap = LoadPixmap("Materials/zonesunset.png")
if pixmap.size.x ~= pixmap.size.y * 6 then
	Print("Error: Wrong image aspect.")
	return
end
Next we will create a series of six pixmaps and copy a section of the image to each one, using the CopyRect method.
--Copy each face to a different pixmap
local faces = {}
for n = 1, 6 do
	faces[n] = CreatePixmap(pixmap.size.y,pixmap.size.y,pixmap.format)
	pixmap:CopyRect((n-1) * pixmap.size.y, 0, pixmap.size.y, pixmap.size.y, faces[n], 0, 0)
end
To save a cubemap you must set the type to TEXTURE_CUBE and the layers value to 6:
--Save as cube map
SaveTexture("CUBEMAP.dds", TEXTURE_CUBE, faces, 6, SAVE_DEFAULT)
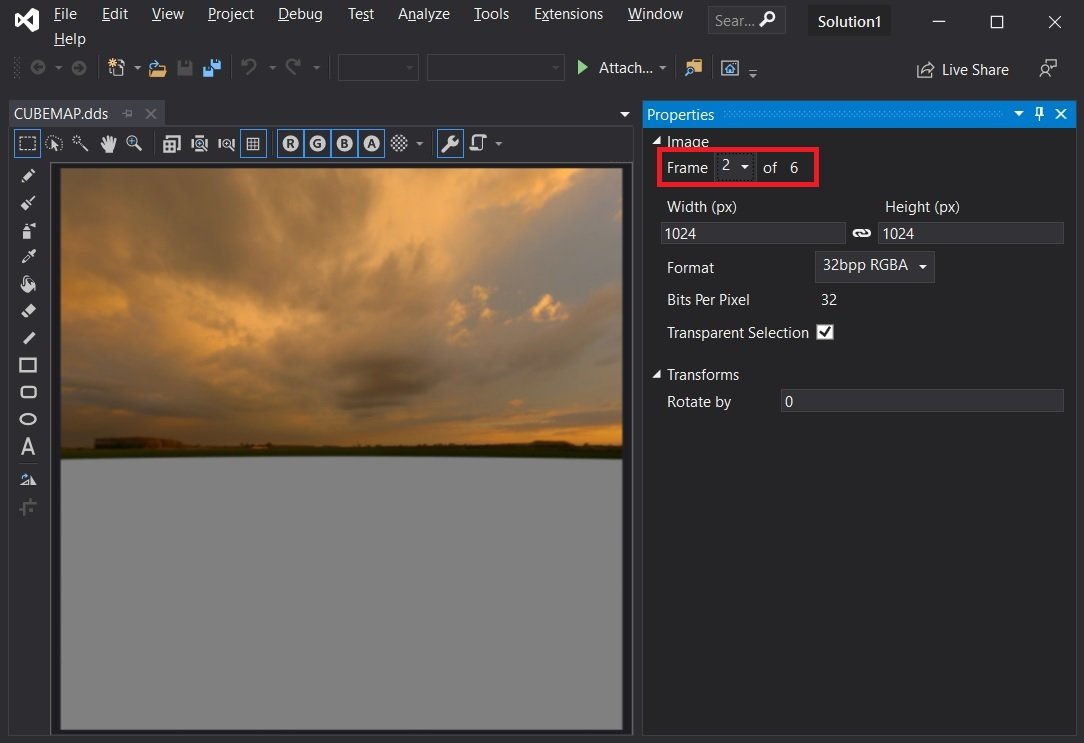
And just like that, you've got your very own cubemap packed into a single DDS file. You can switch through all the faces of the cubemap by changing the frames value on the right:
For uncompressed cubemaps, we can just specify the SAVE_BUILD_MIPMAPS and mipmaps will automatically be created and saved in the file:
--Save as cube map, with mipmaps
SaveTexture("CUBEMAP+mipmaps.dds", TEXTURE_CUBE, faces, 6, SAVE_BUILD_MIPMAPS)
Opening this DDS file in Visual Studio 2019, we can view all cubemap faces and verify that the mipmap levels are being generated and saved correctly:

Now in Leadwerks Game Engine 4 we store skyboxes in large uncompressed images because DXT compression does not handle gradients very well and causes bad artifacts. The new BC7 compression mode, however, is good enough to handle skyboxes and takes the same space as DXT5 in memory. We already learned how to save compressed textures. The only difference with a skybox is that you store mipmaps for each cube face, in the following order:
for f = 1, faces do
	for m = 1, miplevels do
The easy way though is to just save as the RGBA image as a Basis file, with mipmaps. The Basis compressor will handle everything for us and give us a smaller file:
--Save as cube map, with mipmaps
SaveTexture("CUBEMAP+mipmaps.basis", TEXTURE_CUBE, faces, 6, SAVE_BUILD_MIPMAPS)
The outputted .basis file works correctly when loaded in the engine. Here are the sizes of this image in different formats, with mipmaps included:
- Uncompressed RGBA: 32 MB
- BC7 compressed DDS: 8 MB
- Zipped uncompressed RGBA: 4.58 MB
- Zipped BC7 compressed DDS: 3.16 MB
- Basis file: 357 KB
Note that the Basis file still takes the same amount of memory as the BC7 file, once it is loaded onto the GPU. Also note that a skybox in Leadwerks Game Engine 5 consumes less than 1% the hard drive space of a skybox in Leadwerks 4.
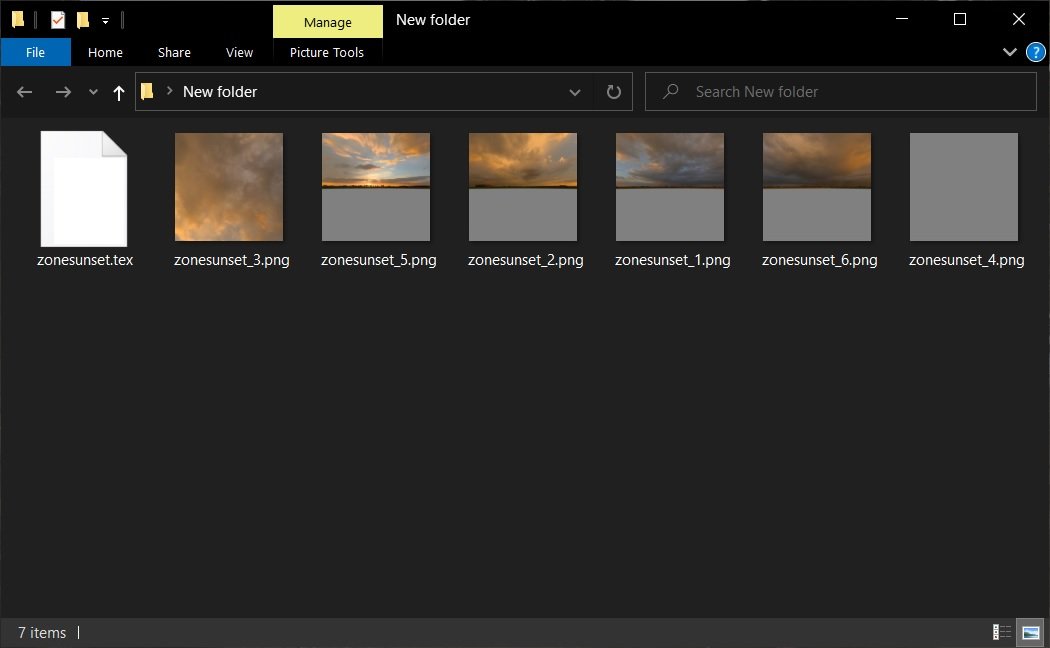
Another option is to save the cubemap faces as individual images and then assemble them in a tool like ATI's CubemapGen. This was actually the first approach I tried while writing this article. I loaded the original .tex file and saved out a bunch of PNG images, as shown below.
Modifying Images
The CopyRect method allows us to copy sections of images from one to another as long as the images use the same format. We can also copy from one section of an image to another area on itself. This code will load a pixmap, copy a rectangle from one section of the image to another, and resave it as a simple uncompressed DDS file with no mipmaps:
--Load image
local pixmap = LoadPixmap("Materials/77684-blocks18c_1.jpg")

--Convert to RGBA if not already
if pixmap.format ~= TEXTURE_RGBA then
	pixmap = pixmap:Convert(TEXTURE_RGBA)
end

--Let's make some changes :D
pixmap:CopyRect(0,0,256,256,pixmap,256,256)

--Save uncompressed DDS file
SaveTexture("MODIFIED.dds", TEXTURE_2D, {pixmap}, 1, SAVE_DEFAULT)
When you open the DDS file you can see the copy operation worked:

We can even modify compressed images that use any of the FourCC-type compression modes. This includes BC1-BC5.. The only difference that is instead of copying individual pixels, we are now working with 4x4 blocks of pixels. The easiest way to handle this is to just divide all your numbers by four:
--Convert to compressed format
pixmap = pixmap:Convert(TEXTURE_BC1)

--We specify blocks, not pixels. Blocks are 4x4 squares.
pixmap:CopyRect(0,0,64,64,pixmap,64,64)

--Save compressed DDS file
SaveTexture("COMPRESSED+MODIFIED.dds", TEXTURE_2D, {pixmap}, 1, SAVE_DEFAULT)
When we open the image in Visual Studio the results appear identical, but note that the format is compressed BC1. This means we can perform modifications on compressed images without ever decompressing them:

The Pixmap class has a GetSize() method which returns the image size in pixels, and it also has a GetBlocks() function. With uncompressed images, these two methods return the same iVec2 value. With compressed formats, the GetBlocks() value will be the image width and height in pixels, divided by four. This will help you make sure you are not drawing outside the bounds of the image. Note that this technique will work just fine with BC1-BC5 format, but will not work with BC6h and BC7, because these use more complex data formats.
Texture SetSubpixels
We have a new texture method that functions like CopyRect but works on textures that are already loaded on the GPU. As we saw with pixmaps, it is perfectly safe to modify even compressed data as long as we remember that we are working with blocks, not pixels. This is the command syntax:
void SetSubPixels(shared_ptr<Pixmap> pixmap, int x, int y, int width, int height, int dstx, int dsty, const int miplevel = 0, const int layer = 0);
To do this we will load a texture, and then load a pixmap. Remember, pixmaps are image data stored in system memory and textures are stored on the GPU. If the loaded pixmap's format does not match the texture pixel format, then we will convert the pixmap to match the texture:
--Load a texture
local texture = LoadTexture("Materials/77684-blocks18c_1.jpg")

--Load the pixmap
local stamp = LoadPixmap("Materials/stamp.png")
if stamp.format ~= texture.format then
	stamp = stamp:Convert(texture.format)
end
To choose a position to apply the pixmap to, I used the camera pick function and used to picked texture coordinate to calculate an integer offset for the texture:
local mpos = window:GetMousePosition()
if window:MouseDown(MOUSE_LEFT) == true and mpos:DistanceToPoint(mouseposition) > 50 then
	mouseposition = mpos
	local mousepos = window:GetMousePosition()
	local pick = camera:Pick(framebuffer, mousepos.x, mousepos.y, 0, true, 0)
	if pick ~= nil then
		local texcoords = pick:GetTexCoords()
		texture:SetSubPixels(stamp, 0, 0, stamp.size.x, stamp.size.y, texcoords.x * texture.size.x - stamp.size.x / 2, texcoords.y * texture.size.y - stamp.size.x / 2, 0, 0)
	end
end
And here it is in action, in a Lua script example to be included in the next beta release: Note that this command does not perform any type of blending, it only sets raw texture data.
![]()
What you see above is not a bunch of decals. It's just one single texture that has had it's pixels modified in a destructive way. The stamps we applied cannot be removed except by drawing over them with something else, or reloading the texture.
The above textures are uncompressed images, but if we want to make this work with FourCC-type compressed images (everything except BC6h and BC7) we need to take into account the block size. This is easy because with uncompressed images the block size is 1 and with compressed images it is 4:
texture:SetSubPixels(stamp, 0, 0, stamp.size.x / stamp.blocksize, stamp.size.y / stamp.blocksize, texcoords.x * (texture.size.x - stamp.size.x / 2) / stamp.blocksize, (texcoords.y * texture.size.y - stamp.size.x / 2) / stamp.blocksize, 0, 0)
Now our routine will work with uncompressed or compressed images. I have it working in the image below, but I don't know if it will look much different from the uncompressed version.
![]()
I'm not 100% sure on the block / pixel part yet. Maybe I will just make a rule that says "units must be divisible by four for compressed images".
Anyways, there you have it. This goes much deeper than the texture commands in Leadwerks Game Engine 4 and will allow a variety of user-created tools and extensions to be written for the new level editor. It all starts with the code API, and this is a fantastic set of features, if I do say so myself. Which I do.
2 Comments
Recommended Comments